


Introduction
If you have been into developing applications for some time, you must have come across the terms Containers and Docker, or if you like to explore new open-source projects, you might have seen a file called Dockerfile in some repositories and wondered what it does. Well, this article is here to help you.
If you have developed any kind of application, as a personal project or for learning purposes, to deploy the application, you would've just gone to some cloud providers like Heroku (RIP free tier 😭), Vercel, Digital Ocean, AWS etc., and deployed all of your code at once on a server that either you bought or just got as a freebie. But modern application deployment (and development) has moved past this method. And through this article, I will help you in getting started with this modern way to building and deploying what is something called a cloud native application.
I am assuming here that you have some idea of how servers work and how you deploy your apps typically. If you know it, then let's get started.
What are Containers

In your home, you typically use containers to store some things and then move that container from one place to another. If you want to give the contents of the container to someone else, you just pass on the container. That's exactly what containers are doing here.
In the good old days, applications used to run on servers on top of an OS. Typically, a single server (or computer) ran only one application for the issues of resource management and sharing that arises with having multiple applications on a single server. This made scaling the application difficult as you would have to buy more servers to scale your application.
Then came in the concept of Virtualization to help solve this issue. Now, you could run multiple Virtual Machines on a single server, each running its own OS in an isolated environment. You could now run your application in these VMs and just install more VMs in order to scale. But here also, as each VM ran a full copy of an OS, it consumed a lot of resources of the host machine.
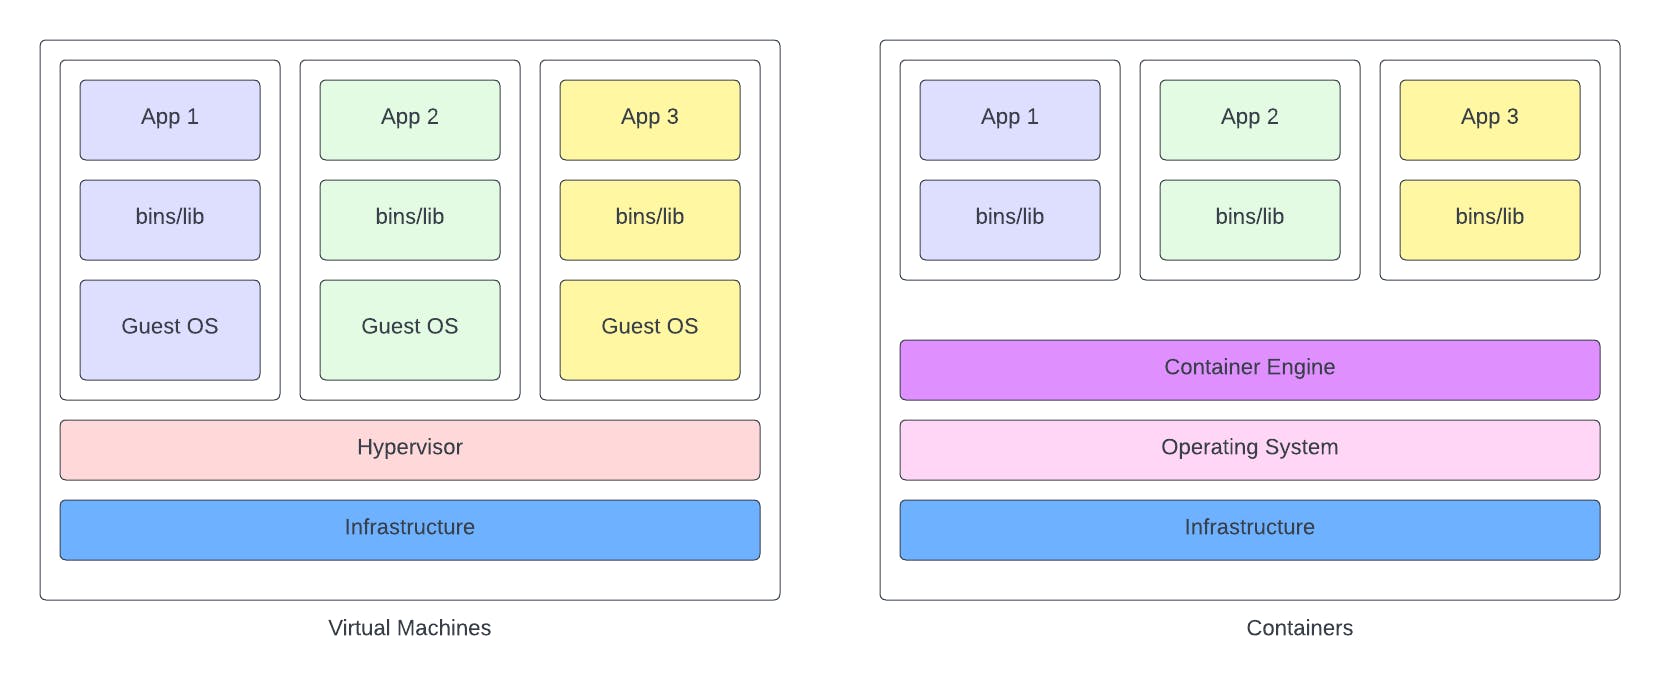
Here comes in the containers! Containers just took the concept of VMs but ditched the idea of having its own OS, and instead took advantage of the host OS. Containers still run in an isolated environment with the contents on its inside unaware of the outside world, but it allows to free up a good amount of resources by not running its own OS. It allows you to package everything that your application needs to run and ship it. Containers also solve the age-old problem of "It runs on my machine". Containerized application runs the same on every machine.
Where does Docker fit in?
Now a days, the terms containers and docker are almost used interchangeably, though these two are very different things. Docker (the company) created Docker (a tool) that allows you to containerize your applications. Therefore, Docker is merely a means for you to create containers. There are also other containerization tools out there like Podman, Containerd, Buildah, etc.
For a detailed understanding of containers and Docker architecture, read here
Enough chit chat, let's get started!
Let's Containarize
Installing Docker
You need to install Docker desktop to get started with docker. It will install all the tools required in your machine. You can download Docker desktop for your respective OS from here
Once you have installed Docker, check for the installation by running this command. Make sure that you have Docker desktop running at this point.
docker --version
Docker desktop is responsible for running the Docker daemon on your machine. So if it is not running, docker commands will not work. Find out more here
Difference between Images and Containers
When working with Docker, you will come across these two terms. We have looked at containers but now what is this image for? Here is a very basic outline of what these are:
Image is just a definition of your container. It contains all the code and instructions bundled together that will eventually run in your container. If you are familiar with classes and object, Image is the equivalent to a class in this case.
Container is a running instance of an image. You need an image to run a container, and you can run multiple containers from the same image. Container is equivalent to an object here.
To get a list of all images in your system, run this command:
docker image ls
To see all the containers, run this:
docker ps -a
Creating an image
Now we will create an image for an application that will run inside a container. Go ahead and clone this starter-repository. This is a very simple Node.js and Express REST API that creates a list of 10 random users and has two endpoints:
- /users : get all users
- /users/:id : get user by id
You can try to run the application locally by running the following two commands:
yarn install
yarn dev
If you want to create an image of an existing project of yours, feel free to do so. Just get the idea of how to create an image.
Creating the Dockerfile
Docker creates an image based on a Dockerfile that we need to create in the root of the project directory. Make sure that it has no extension. Just "Dockerfile". Paste this code into your Dockerfile.
FROM node:latest
WORKDIR /app
ADD package.json ./
RUN yarn install
ADD . .
RUN yarn build
CMD yarn start
Let's see what we did.
FROM node:latest : We almost never create an image from scratch and always use some base image on top of which we create our own image. Here, as we want to run a node application, we want our base image already configured to run node. The latest specifies the version. It will first look for a node:latest image in your local machine, if not found it will download it first from dockerhub.
WORKDIR /app : Specifies that all the commands following this needs to be run within the app/ directory. If it doesn't exist, it will be created. It just means that all our code will be put inside an app/ directory within the container.
ADD package.json ./ : We are adding package.json inside the directory.
RUN yarn install : Install the required node packages defined in package.json.
ADD . . : Add everything from the current directory to the app/ directory.
RUN yarn build : As this code is written in typescript, run the build command to compile it into javascript.
CMD yarn start : This is not run by the image, but by the container as the starting point of the container. When we run a container from this image, it will run this command to start our application inside the container.
RUN vs CMD
RUN is executed while creating an image while CMD is executed while running a container. A Dockerfile can have multiple RUN commands, but only one CMD command which comes at the end.
Building the image
Now that we have the Dockerfile defined, we can build an image out of it by running this command when inside the root directory of your project:
docker build --tag first-node-image:latest .
The --tag specifies the name and the version of the image. The "." specifies where your Dockerfile is. As we were on the root of the project directory, we just said ".".
Now if you run docker image ls, you should see your newly built image.
Running your Container
This is the moment of truth. Finally, to run a container from your image, just run this command:
docker run --name first-node-container -p 5000:5000 -d first-node-image:latest
- We specify the name of the container using the --name tag.
- The API will run on port 5000 inside the container, but as we want to access it from the browser, we want to map one of our own ports to the container port. We do this -p tag followed by own-port:container-port. You can also choose some other port like 3000 or 8080.
- -d is used to run the container in the detached mode.
Now if the command executed successfully and you see some random long string after it, your container has started. If you run docker ps, you should see first-node-container in the list of running containers.
And if you did everything correctly, now if you go the localhost:5000/users in your browser, you should see a list of details of random users.
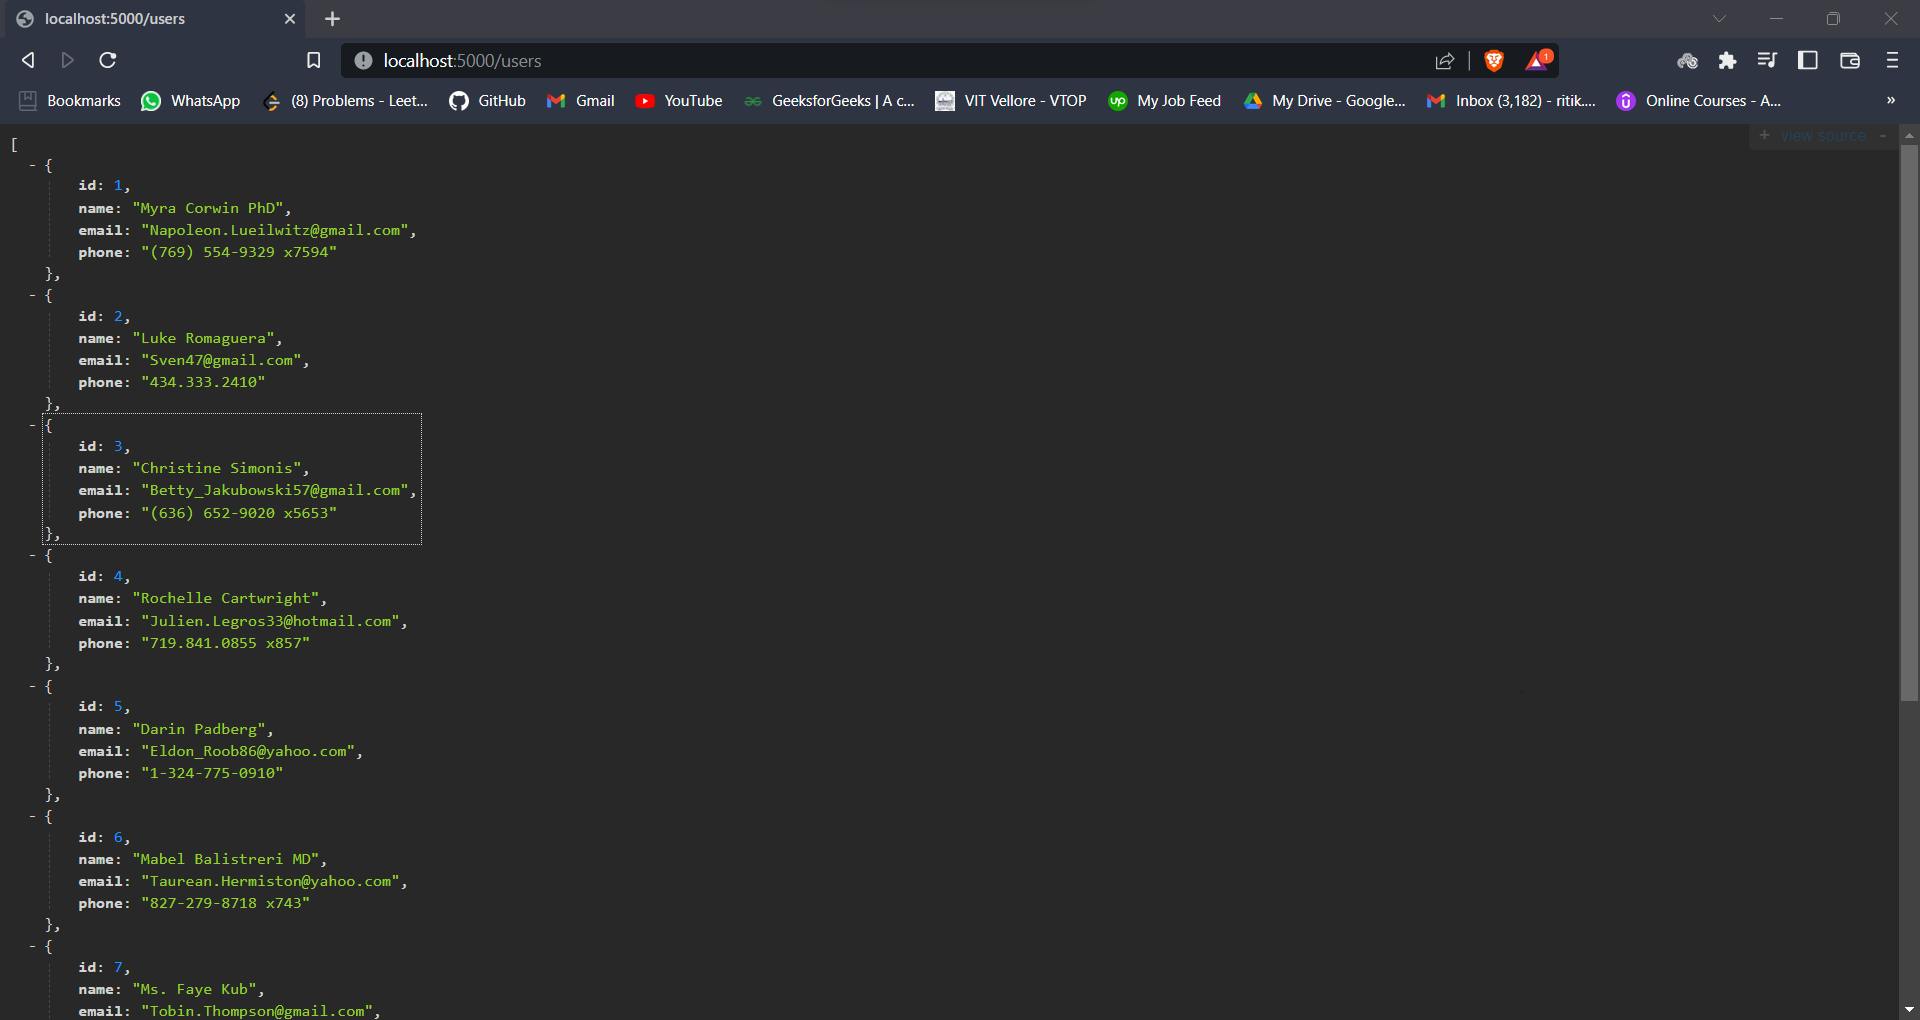
And there you have it! You have successfully run your first Docker container. Achievement unlocked! 😎
What's Next?
Well, Docker container is only the first stepping stone into the world of building modern cloud-native applications. There are a whole bunch of tools and methods that are used to maintain and scale modern infrastructure, like writing microservices, deploying them in hundreds of containers in a Kubernetes cluster and managing them effectively. I will try to cover these topics soon as well.
You can also publish your Docker images into a registry liked dockerhub. Think of your images like your code and docker hub like GitHub. You can share your images with others and try out images created by others.
But as they say, one step at a time. Till then, pick any of your old or new project and try to containerize it. Just write a Dockerfile, build an image, and run your container.
See you soon!